Capulator is a basic capital gains calculator for cryptocurrency traders. Given a CSV-formatted
ledger file of cryptocurrency purchases and sales, it performs FIFO cost basis and capital gains
calculations. Results are output back to a new CSV-formatted ledger file. Multiple symbols are
supported at once.
Usage
Usage is documented in the program’s help, which can be viewed with the --help program argument.
Ledger File Format
Supported ledger files are basic CSV files. For examples of the expected structure, take a look at
the integration test data in the tests package.
Testing
Both unit tests and integration tests can be run for Capulator. Unit tests for each consumed package
can be run with a simple go test command issued from the root of the project. Integration tests
reside in the tests directory and package, and can thus be run with a special go test ./tests
command issued from the root of the project.
Disclaimer
Capulator was created solely for the author’s own personal use. Use it for real-world calculations
at your own risk – it is not gauranteed to produce accurate results.
Hyperledger Fabric을 이용한 블록체인 기반 실시간 기업 간 정산 시스템 프로젝트 (Settlement Business Network)
본 프로젝트는 블록체인 놀이터 교육장에서 제공하는 교육 프로그램인 하이퍼레저 패브릭을 활용한 블록체인 앱(dApp) 개발에서 수행한 개인 프로젝트로 기업 간 거래에서 발생하는 거래 데이터 중 정산 데이터를 블록체인으로 연동하여 처리하는 “블록체인 기반 실시간 기업 간 정산 시스템 기술” 개발을 목표로 한다.
chaincode: 블록체인 비즈니스 네트워크에 배포될 실시간 정산을 위한 체인코드 소스 디렉토리 (javascript로 작성)
gateway: 블록체인 비즈니스 네트워크에 배포된 실시간 정산 체인코드와 연동하여 사용자의 요청에 의해 데이터를 전달하는 HTTP 기반 실시간 정산을 위한 API 서버 소스
network: 실시간 정산 비즈니스 네트워크를 구성하는 하이퍼레저 기반 실시간 정산 비즈니스 네트워크 구성 소스
ui: 사용자 UI
구동 절차
export SETDAPPHOME=/home/aaa/setdApp
블록체인 비즈니스 네트워크 구동
Org1 인증서 생성
Org2 인증서 생성
Channel-Artifacts 생성: 6개의 프로파일을 생성한다.이 중 Org1OrdererGenesis, Org1Channel를 사용한다.
Org1OrdererGenesis
Org1Channel
Org2OrdererGenesis
Org2Channel
Org12OrdererGenesis
Org12Channel
블록체인 네트워크를 구동
Settlement Business Network 구동 (체인코드 1.0 배포)
Org2 추가 (체인코드 2.0 배포)
cd${SETDAPPHOME}/network
./start.sh
hosts 파일 수정
    아래 정보를 추가한다. 이유는 인증서를 내려받기 위해서 ca에 접속하는데
    도메인 이름으로 접속하기 때문에 아래와 같이 hosts 파일에 ca 정보를 추가한다.
    sudo vi /etc/hosts
    127.0.0.1 ca.org1.biz1.com
    127.0.0.1 ca.org2.biz2.com
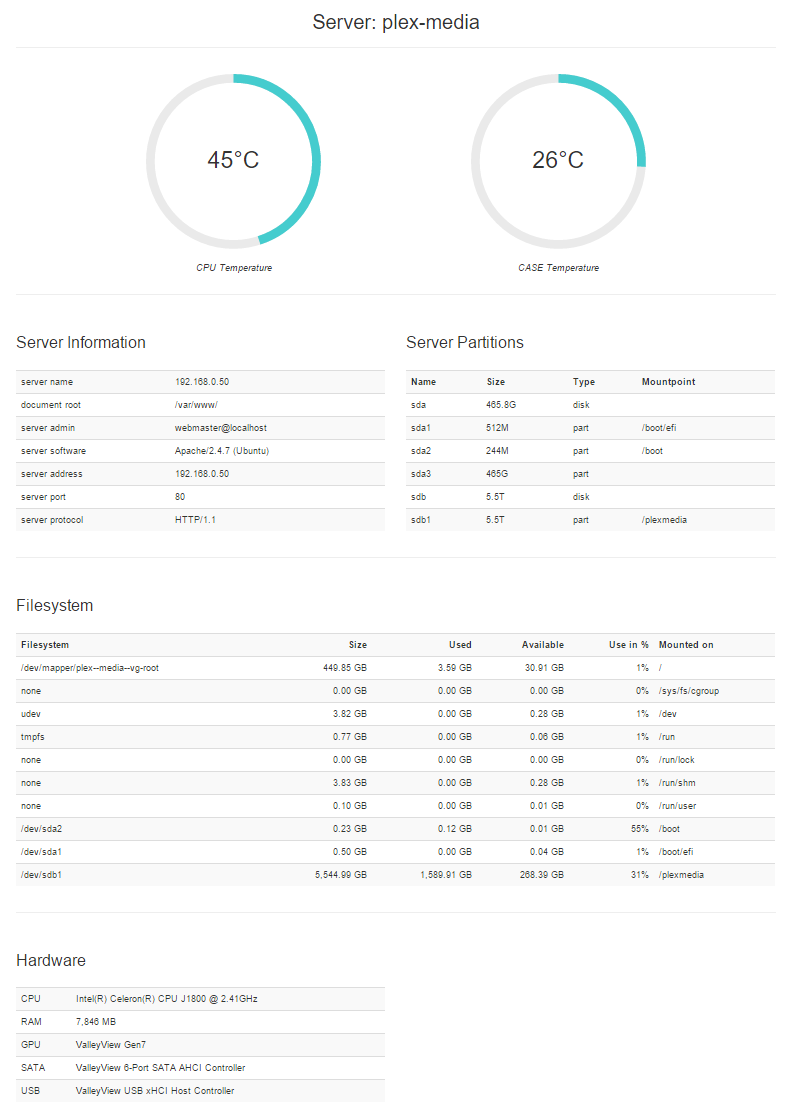
I searched a very small web application to saw some information over my server (like a Plex-Media Server or a Fileserver or Raspberry Pi’s).
All the Web GUI’s I found were to large for my mind, like Webmin or Ajenti.
Please note: Over this small tool you can’t manage your server, you are only see sensor data or some CPU data of your server.
The server side has an PHP part with Slim PHP. So the server is with the REST API very expandable and the frontend is flexible.
Then clone this repository and install the dependencys:
npm install
Copy the complete folder into the root of the webserver:
/var/www (normaly)
Thats it.
This application is only for internal usage. The application has no authentication or something else, so don’t publish your server into the internet or NAT your IP to the :80 default port of your Apache Webserer. If you have a exist webapplication on the port 80 or 443 deploy server-info on an other subdomain or port!
API Documentation
The REST API Documentation is generated with apidoc. You will found the actual version under the folder “doc”.
Screenshots
Licenced under MIT licence
Copyright (c) 2015 secanis.ch
Permission is hereby granted, free of charge, to any person obtaining a copy
of this software and associated documentation files (the “Software”), to deal
in the Software without restriction, including without limitation the rights
to use, copy, modify, merge, publish, distribute, sublicense, and/or sell
copies of the Software, and to permit persons to whom the Software is
furnished to do so, subject to the following conditions:
The above copyright notice and this permission notice shall be included in
all copies or substantial portions of the Software.
THE SOFTWARE IS PROVIDED “AS IS”, WITHOUT WARRANTY OF ANY KIND, EXPRESS OR
IMPLIED, INCLUDING BUT NOT LIMITED TO THE WARRANTIES OF MERCHANTABILITY,
FITNESS FOR A PARTICULAR PURPOSE AND NONINFRINGEMENT. IN NO EVENT SHALL THE
AUTHORS OR COPYRIGHT HOLDERS BE LIABLE FOR ANY CLAIM, DAMAGES OR OTHER
LIABILITY, WHETHER IN AN ACTION OF CONTRACT, TORT OR OTHERWISE, ARISING FROM,
OUT OF OR IN CONNECTION WITH THE SOFTWARE OR THE USE OR OTHER DEALINGS IN
THE SOFTWARE.
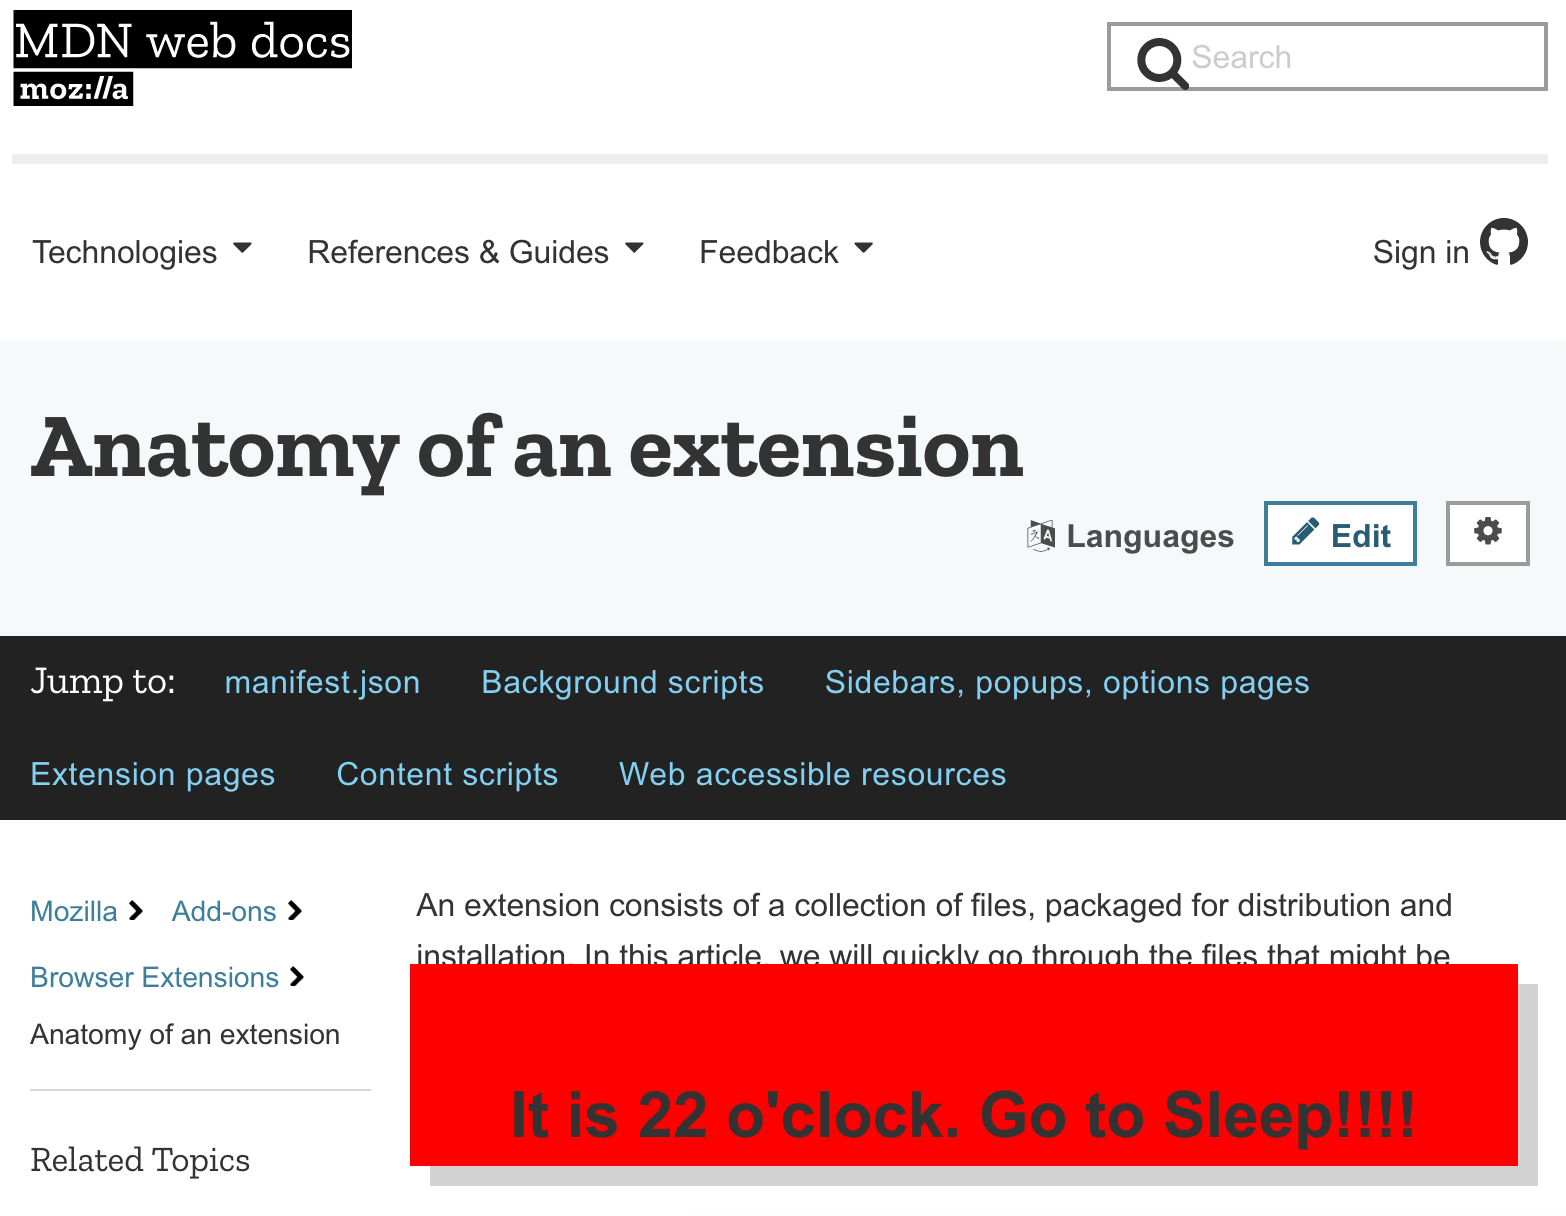
Bedtime is an extension remind you/me to get off the internet and to go to sleep. The extension displays a warning on the lower right hand of a website, telling you well, to go to sleep, if you browse the web after your bedtime.
After installing the browser extension, you can set your bedtime in the using the popup in the browser bar. The options are 9 pm, 10 pm, 11 pm and midnight. If you’d like to set the bedtime later, feel free to fork this repo or open an issue!
Why is it?
To remind myself late at night, on the web, to go to bed!
And in case anyone else needed that reminder too.
How is it?
The browser extension has the same key elements of all browser extensions.
The manifest.json file gives the browser extenion permission to run on the active tab, for all websites, to store the bedtime from the popup and to set the icon for the browser bar.
The content_script.js script runs on every page you visit, checking whether the current time is after either the current bedtime and before 6 am. The current bedtime is either the one set from the popup, or the system default (11 pm).
The popup.js script listens to clicks to the popup and then sends the storedbedtime to the content_script.js file.
Thanks to:
All those at Codebar.io and Web Frontend Co-Learning meetups who helped me talking through learning how to make an extension!
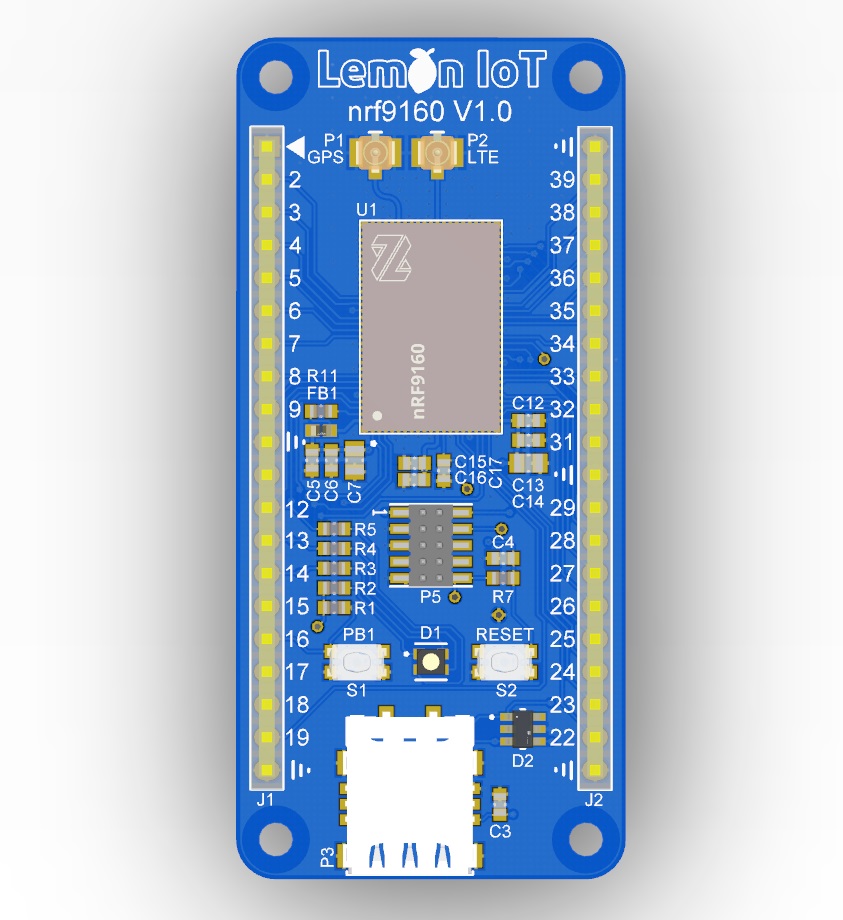
Before you can target the Lemon IoT LTE board in Zephyr (nRF Connect SDK), board files will need to be downloaded from the Zephyr board files folder and placed in the \Nordic<SDK version>\zephyr\boards\arm folder.
Two targets exist
Lemon IoT NRF9160 and
Lemon IoT NRF9160 non-secure.
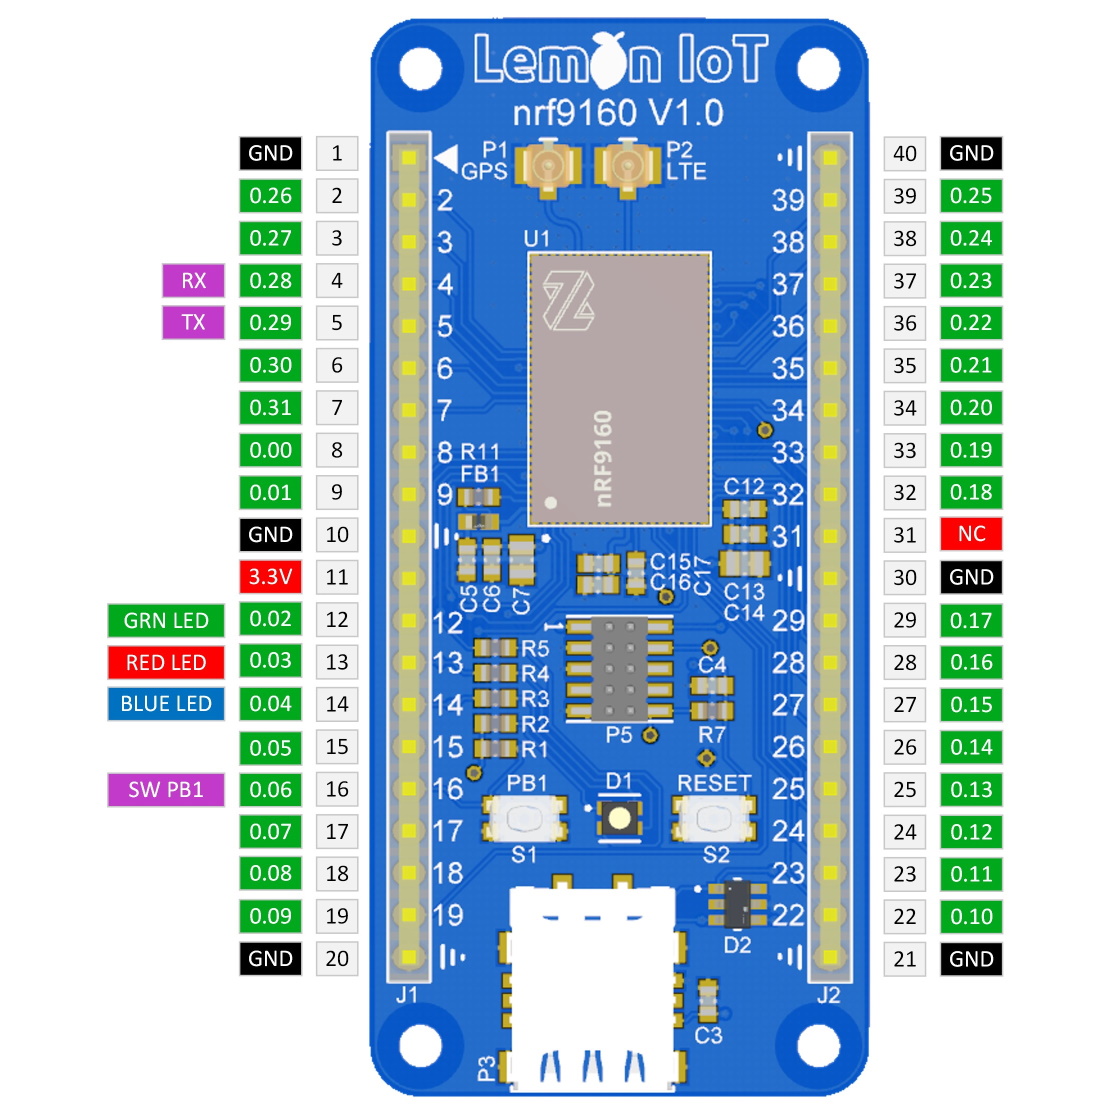
The board files also contain the device tree. The following GPIO has been allocated on the following pins:
Other I/O, for example, I2C, SPI & extra UART communication buses can be added by using DeviceTree overlays in your application project. This provides the end user with the most flexibility in allocating I/O. For an example on how to achieve this, please see the I2C Sensor Example or SPI Sensor Example
The nRF9160 has four instantiated serial communications peripherals. Each can be configured as either I2C (Also known as TWI or Two Wire Interface), SPI or UART. The Lemon LTE module already has allocated the first serial peripheral to UART (&uart0). This requires additional serial peripherals to be allocated with unique instances, for example &i2c1. Using &i2c0 will conflict with the already allocated &uart0.
Serial Bootloader
If you don’t have access to an ARM programmer (Segger J-Link, Nordic Development Kit etc), then the most cost-effective method of programming the Lemon IoT LTE module is via the pre-installed serial bootloader. Information on the serial bootloader can be found in the bootloader/ directory.
Examples
Both the zephyr OS and Nordic nRF SDK contain a wide variety of examples to base your next product on.
In addition to these examples, we have some specific examples for the Lemon IoT LTE module in the Examples folder.
Before you can target the Lemon IoT LTE board in Zephyr (nRF Connect SDK), board files will need to be downloaded from the Zephyr board files folder and placed in the \Nordic<SDK version>\zephyr\boards\arm folder.
Two targets exist
Lemon IoT NRF9160 and
Lemon IoT NRF9160 non-secure.
The board files also contain the device tree. The following GPIO has been allocated on the following pins:
Other I/O, for example, I2C, SPI & extra UART communication buses can be added by using DeviceTree overlays in your application project. This provides the end user with the most flexibility in allocating I/O. For an example on how to achieve this, please see the I2C Sensor Example or SPI Sensor Example
The nRF9160 has four instantiated serial communications peripherals. Each can be configured as either I2C (Also known as TWI or Two Wire Interface), SPI or UART. The Lemon LTE module already has allocated the first serial peripheral to UART (&uart0). This requires additional serial peripherals to be allocated with unique instances, for example &i2c1. Using &i2c0 will conflict with the already allocated &uart0.
Serial Bootloader
If you don’t have access to an ARM programmer (Segger J-Link, Nordic Development Kit etc), then the most cost-effective method of programming the Lemon IoT LTE module is via the pre-installed serial bootloader. Information on the serial bootloader can be found in the bootloader/ directory.
Examples
Both the zephyr OS and Nordic nRF SDK contain a wide variety of examples to base your next product on.
In addition to these examples, we have some specific examples for the Lemon IoT LTE module in the Examples folder.
An experimental hypermedia API client designed to fulfil the HATEOAS part of REST.
Only HTTP(s) is supported in a useful state right now, as it’s by far the most used mechanism for APIs currently, though
since HTTP is not a requirement for RESTful APIs, the interface presented by this library will aim to be
protocol agnostic.
By understanding common content-types and standards where available (and allowing flexible configuration otherwise)
we are able to provide an expressive syntax to navigating and interacting with APIs.
Features
Iteration over collections, even when paginated
Support for following hypermedia links
Support for performing actions through hypermedia controls
Support for various formats and standards
JSON HyperSchema
Collection+JSON
JSON-LD
HAL
HAL Forms
JSON:API
OpenAPI / Swagger
How it works
To begin interacting with an API, you need an ApiClient. Initialise one with an array of supported protocols. An
example, using HTTP and Guzzle looks like this:
The built-in HTTP protocol class uses HttPlug for it’s HTTP abstraction, can support many libraries such as cURL and Guzzle.
You can also provide test adapters for testing your apps or integrations.
From here you can interact with the resource, get data from the response, iterate over lists and follow and act upon
hypermedia links defined in the API.
Taking advantage of REST
Just like your web browser navigates the internet by starting with a URL and following links or filling in forms,
equipped with the knowledge of HTTP, HTML, JavaScript, etc.. that’s what we’re aiming for with our API client.
You’ll need to teach your client how to understand how the APIs you’re interacting with work. Perhaps it’s using
JSON:API, maybe it’s using HAL or JSON HyperSchema. This is where extensions come in.
As the hypermedia client loads a resource and delegates that loading to the protocol, they emit various events through
the event dispatcher. Extensions listen to these events and provide the ability to parse various content types and understand
various hypermedia description formats.
Using REST-ish APIs
While hypermedia controls are a requirement for REST, and help to decouple an API and its integrations, not all APIs are
RESTful. Whether they claim to be or not, some simply aren’t. This does not make them inherently bad APIs, but you will
need to do a bit of extra work in order to use them with this hypermedia based client.
A “One-Click solution” to deploy a scalable and secure Kubernes + DASK cluster in one step on AWS in 10 minutes.
The solution has many advanced and configurable options via AWS CloudFormation, only requires minimal knowledge of AWS and Kubernetes. It is ideal if you need a secure, private DASK cluster to process your own data.
It is hihly recommended to use an S3 bucket and mount it to persist your notebook files. (see below)
The Jupyter notebook data persisted to private, mounted S3 buckets.
NOTE:DASK is a scalable, distributed Python based data analytics / data science tool.
Main features
One-click, automated Kubernetes + DASK deployment
Kubernetes cluster node and pod auto-scaling, 100% Kubernetes compatibility using KOPS
Automated OpenVPN setup, immediate private access to JupyterLab (notebooks) and DASK scheduler via VPN
SPOT EC2 worker node usage possibility to cut costs
S3 bucket mount on all nodes to persist notebooks and access S3 data easily
Custom Jupyter password setup
Install custom PIP and Conda packages (list) during bootstrap
Ability to us customized DASK Docker images
Notify via SNS when cluster is deployed and ready to use
One-click deployment tear-down
AWS region independent dynamic AMI image selection
NOTE: I always keep focus on security and flexibility, so the deployed cluster is running in private AWS VPC and accessible only via OpenVPN. The VPN setup is automated so only a client application needed to sue it. I do not change the original Docker images. All deployment running on separately created AWS VPC.
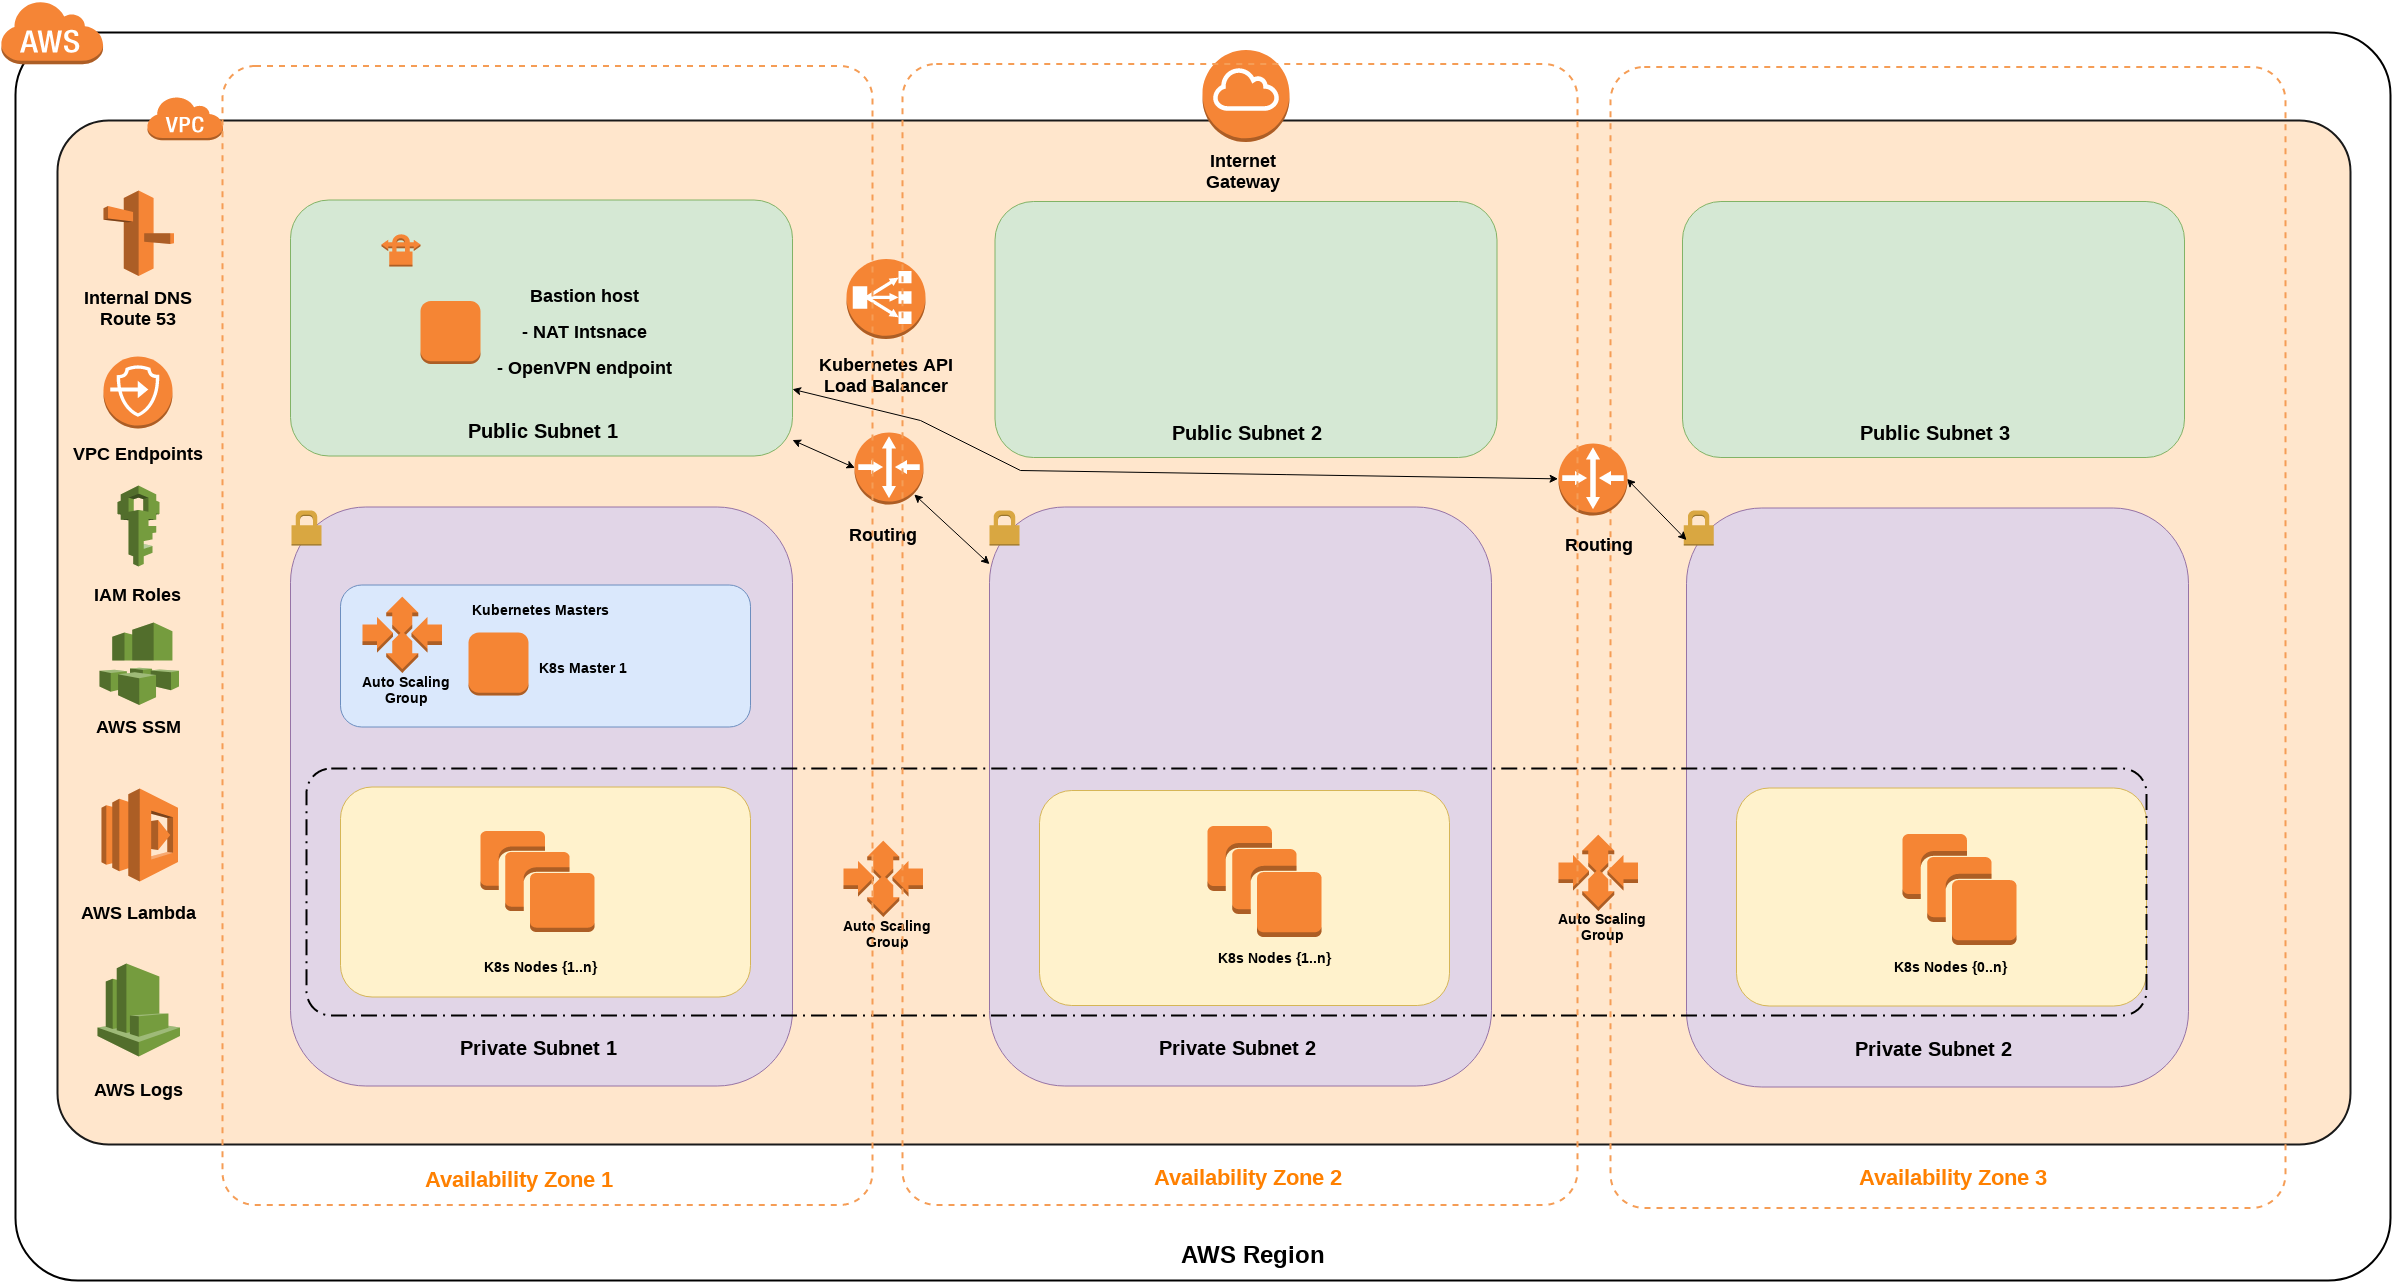
Architecture and details
AWS architecture
The deployment architecture consist of two parts, the first is the Kubernetes running on AWS and the DASK deployment on the Kubernetes cluster.
NOTE: There are default CFN parameters, you do not need to change them to deploy your cluster. The above documentation helps you customize the deployment according your needs.
AWS and Kubernetes Configuration
Creates a new VPC with defined CIDR block: the newly created VPC Ipv4 CIDR
Bastion Allowed Access – IPv4 CIDR: from where the bastion host accessible, 0.0.0.0/0 means public.
AWS EC2 / Kubernetes Configuration
Existing EC2 keypair name for instances: previously created Ec2 keypair name (access the cluster via SSH, EC2 KeyPair) !REQUIRED!
Bastion instance type: the bastion host AWS EC2 instance type (EC2 types and prices)
K8s Master Instances Type: Kubernetes cluster MASTER node EC2 instance type (EC2 types and prices)
K8s Nodes Instances Type: Kubernetes cluster NODES EC2 instance type (EC2 types and prices)
K8s Nodes SPOT MAX Bid price /h: Kubernetes nodes maximum SPOT price. If you leave 0, empty or negative, on-demand instances deployed. (EC2 SPOT types and prices)
K8s AutoScaling MINIMUM Node Number: The minimum number of deployed as Kubernetes NODES. 3 is required as the minimum.
K8s AutoScaling MAXIMUM Node Number: The maximum number of deployed as Kubernetes NODES. The maximum used by the cluster-autoscaling. The cluster-autoscaler plugin is deployed by default.
K8s AutoScaling MINIMUM Node Number: The minimum number of deployed as Kubernetes NODES. 3 is required as the minimum.
K8s Instances Disk Size: The AWS EBS volume attached to Kubernetes cluster members as a root volume (GB).
S3 bucket NAME for CFN Bootstrap Files: The S3 bucket name, where the Kubernetes cluster bootstrap files and DASK bootstrap files are located. The default used tatobi-dask-aws-deploy is public read-only, you can fork the whole solution, modify the files and replace this bucket with your one.
S3 key prefix for CFN Bootstrap Files: The above bootstrap bucket “subfolder” (or S3 key) where the boostrap files are located.
DASK mounted S3 bucket name to work subfolder: If NOT empty, this S3 bucket will be mounted to: /home/jovyan/work You can store the processed data, the results and Jupyter notebooks here.
KOPS relese number: Which KOPS version is used to deploy the cluster. Keep default 1.10.0
kubectl release number: Which Kubectl version is used to deploy the cluster. Keep default 1.10.7
helm release number: Which HELM version is used to deploy the cluster. Keep default 2.10.0
Kubernetes and bastion host OS: Ubuntu 16.04LTS is the currently supported OS verion only. The latest 18.04LTS support coming soon (depends on KOPS).
Download link for Goofys S3FS binary: The S3FS mount uses Goofys, it is the download URL of binary.
Advanced DASK Configuration
Password for access DASK JupyterLab notebook: The login password for JupyterLab notebook
AWS SNS topic ARN for DASK setup finsihed notifications: If you have and already existing AWS SNS notification topic, this ARN can be used to notify you when the deployment is ready.
Password for access DASK JupyterLab notebook: The login password for JupyterLab notebook
Custom DASK Jupyter Docker image URI: We use the default HELM and DASK Docker images if you leave empty, if not, paste here your own DASK Jupyter Docker image path. It maybe useful if you have many pre-installed pip, conda packages, custom binaries or data placed in your images.
Custom DASK Worker Docker image URI: We use the default HELM and DASK Docker images if you leave empty, if not, paste here your own DASK Worker Docker image path.
Comma separated list of extra CONDA packages to install: Define here which CONDA packages need to be installed during the deployment.
Comma separated list of extra Python PIP packages to install: Define here which Python PIP packages need to be installed during the deployment.
NOTE: “I acknowledge that AWS CloudFormation might create IAM resources.” should be checked.
Access DASK
Because the deployment does not need HTTPS (SSL) connection, but the secure access is essential I’ve chosen OpenVPN to connect your machine or your on-premises to the Kubernetes – DASK cluster running on AWS.
OpenVPN
[1]: Download and install OpenVPN on your client Operating System:
[2]: Download OpenVPN connection profile from your AWS CloudFormation stack output
Go to the AWS console CloudFormation page
Choose your Stack Name checkbox (default: “DASK-AWS-Kubernetes”)
Click on Outputs TAB (below)
Click on DownloadOpenVPNConfigURL URL and save it openvpn-secrets.zip
UNZIP the openvpn-secrets.zip file with your DASJupyterAndUnZIPPassword Output password ans save one of the *.ovpn file to you machine, the example file name is: DASK.OVPN.dask-aws-kubernetes.1.ovpn
Download DASK URL file: on Output tab, choose DownloadDASKAccessURL download and save the dask-connection.zip file, UNZIP it with the same DASJupyterAndUnZIPPassword password, save and open text file: dask-connection.zip
open the dask-connection.txt and extract information:
Login to Jupyter Lab with DASJupyterAndUnZIPPassword Output parameter.
NOTE: These are AWS internal Loadbalancers, they have internal private IP addresses, so there is no external public acccess, only via OpenVPN.
[3]: OPTIONAL: if you use S3FS S3 bucket mounts, save your data (from cluster or remotely), notebooks to /home/jovyan/work
NOTE: Every node has this S3 mount path accessible, not just the JupyterLab!
Delete stack
There is a seamless tear-down integration in the deployment. If you don’t need the deployment anymore, go to AWS Console , CloudFormation page, chosse your stack and choose Actions -> Delete stack.
References
There are 3 open source projects I created previously, the current solution consists common parts from them:
Snipes zealots for you with the frozen scythe in hypixel skyblock. Version 1 was based on computer vision and pyautogui, but the mouse controls were fumbly and a pain to implement, leading to it’s discontinuation.
Consider giving this repository a star!
Features
Built-in Fullbright and Togglesprint module (both enabled by default). Default ClickGUI keybind is RSHIFT.
Zealot Sniper module
Default keybind is “R”.
Core Features
Aims and shoots at Zealots
Safety features
Admin detector
NPC detector
Lobby shutdown detector
Death detector
Detects when player is looking at you for too long
Detects if your name appears in chat messages
Two movement modes: SneakForward and JumpSneak
Randomized time interval for switching between movement modes
Two targeting modes: Distance based and Rotation based. Default is rotation, but will switch to distance when Special Zealot spawns.
Future features
End pedestal auto sacrifice
Baritone integration to return to orginal farming spot after /warp home
Silent and smooth aiming
Zealot counter
Lobby verification (Check if there’s already a frozen scythe user in the location)
Endstone protector killer
Auto bazaar sell after full inventory
More randomized movement modes
etc.
Installation
Head to releases and download the jar. The mod is only compatible for 1.12.2 forge. To run it, put it in your mods folder.
Building from source
To build from source, clone the repository and run ./gradlew build.
Development
To setup a development environment, clone the repository and run ./gradlew setupDecompWorkspace. Then, open the build.gradle file in your IDE (e.g. Intellij) and select Open as Project.
Credits
Version 2 now uses the CatClient as its base. It saved me a lot of time, so credit to its authors.
Contributing
Pull requests are welcome. For major changes, please open an issue first to discuss what you would like to change.
Other
ALL free skyblock clients are RATs. I found that out the hard way because I was an idiot and lost around 2 bill. I’m was really fucking annoyed and decided to make my own. The project probably contains bad code, as it was rushed to completion during exam season.
If you don’t trust this client, you can check through the source code.


 https://github.com/lukehollenback/capulator